

Don’t believe that only computer experts are the most popular dinner party guests. Ham cutters are also bombarded with endless questions on how to cut and keep a ham. This is all too familiar for our friend and professional ham cutter Zulima Esteban. So, we’ve asked her to talk about what we should do to cut ham perfectly in our homes.
She has drawn up a sort of Top Ten of frequently asked questions that she hears at the amateur workshops she gives and at social gatherings. These are the FAQs that Zulima is used to answering. Here we go.
Where do I start a ham at home?
The most usual recommendation is to start the ham on the knuckle. This means on the narrowest part with the hoof facing down. The traditional argument is that, as this is the least fatty and driest part, if we start elsewhere, by the time we get to it, the knuckle will be too hard.
For Zulima, she’d recommend starting the ham at the cushion, with the hoof facing up. This is the part that offers the best slices, and the best stability for the piece when cutting, as you go through it, something that we can’t emphasise enough, because ham stands that we use in our homes are not as stable as professional equipment. She would not recommend having a ham in your home if you are “not going to cut it every 3 or 4 days at most.” If you cut that often and the ham is ready to eat, the knuckle should not dry out too much.
How do I clean my ham?
It’s important to grasp a few basic ideas concerning the piece’s anatomy. You just have to know where the bones are to “mark them” with a paring knife and avoid creating a “boat” that we see in many places. According to Zulima, “a straight cut is not only aesthetic, but it is the best way of not leaving uncut ends, which will have hardened by the time we realise it.”
The rind or the fat on the ham has to be cleaned, clearing around a quarter following a straight line from hoof to tip, always leaving one or two centimetres below the cut so that there are no remains of rind or yellow fat on the slice. “My advice is that when you finish cutting, you should leave it ready for the next time, otherwise you get lazy and these parts we want to avoid end up on the plate.” In the case of hams that are not in a V shape, meaning that the skin has been kept intact, such as the PDO Teruel Ham, the rind should be partially cleaned, taking a lot of care and always working towards the hoof to avoid cuts.
How should I cut?
Positioning the piece is important. It should be as perpendicular as possible to you, forming an angle of 90º keeping the hoof away from you.
“When cutting, the most important thing is to control your left hand, so that there’s no chance of cutting yourself. It should always be at a different height from the knife, above it, below or behind the cutting direction.” A comfortable position, without straining your back or elbow, will also help.
It is also important to keep the table clean. Not only concerning hygiene but also for safety’s sake. “If you can’t see the knives, you might cut yourself when you pick them up or remove waste.”
How big should the slices be?
We completely agree with Zulima when she says, “It’s important that they are fine and easy to eat.” A slice should fit in your mouth completely to appreciate its entirety, without having to break it up with your teeth. I’d also recommend that it is around one third fat (although this, like almost everything, comes down to taste).
Which knives should I use?
In this section, and to avoid repetition in the blog, we’re going to send you off to a previous post called What knives do I need to cut ham?
What should my ham stand be like?
According to Zulima, “the basics for a ham stand are that it should be stable with a firm grip on the shank.” Obviously, depending on your budget, you can seek out all types of ham stands that turn and swing and even a version that can be dismantled.
One good trick from our “master cutter” involves placing a cloth between the base and the surface of the table to stop it slipping.
How should I keep a ham at home?
Just like the topic of knives, we’re going to point you in the direction of a previous blog entry, called How should you keep a ham at home?
How do I stop the ham from ‘smiling’?
Smile, boat… call it what you like. As we mentioned previously, it is interesting to know a little about the ham’s anatomy to know where the bones go and be able to avoid them. To do this, we should mark them little by little, meaning, “insert the knife just a few millimetres so as not to damage the slices from a lower level if you’re not sure where the bone is.” By doing this, you can keep your cut straight and really make the most of your ham.
Is it best to debone it?
“The bone is the best way of preserving a ham. If you can avoid it, it’s best not to remove it.” What’s more, any injury that we make to the ham represents a risk, as this might become an entry point for mites or just air that will oxidise the area.
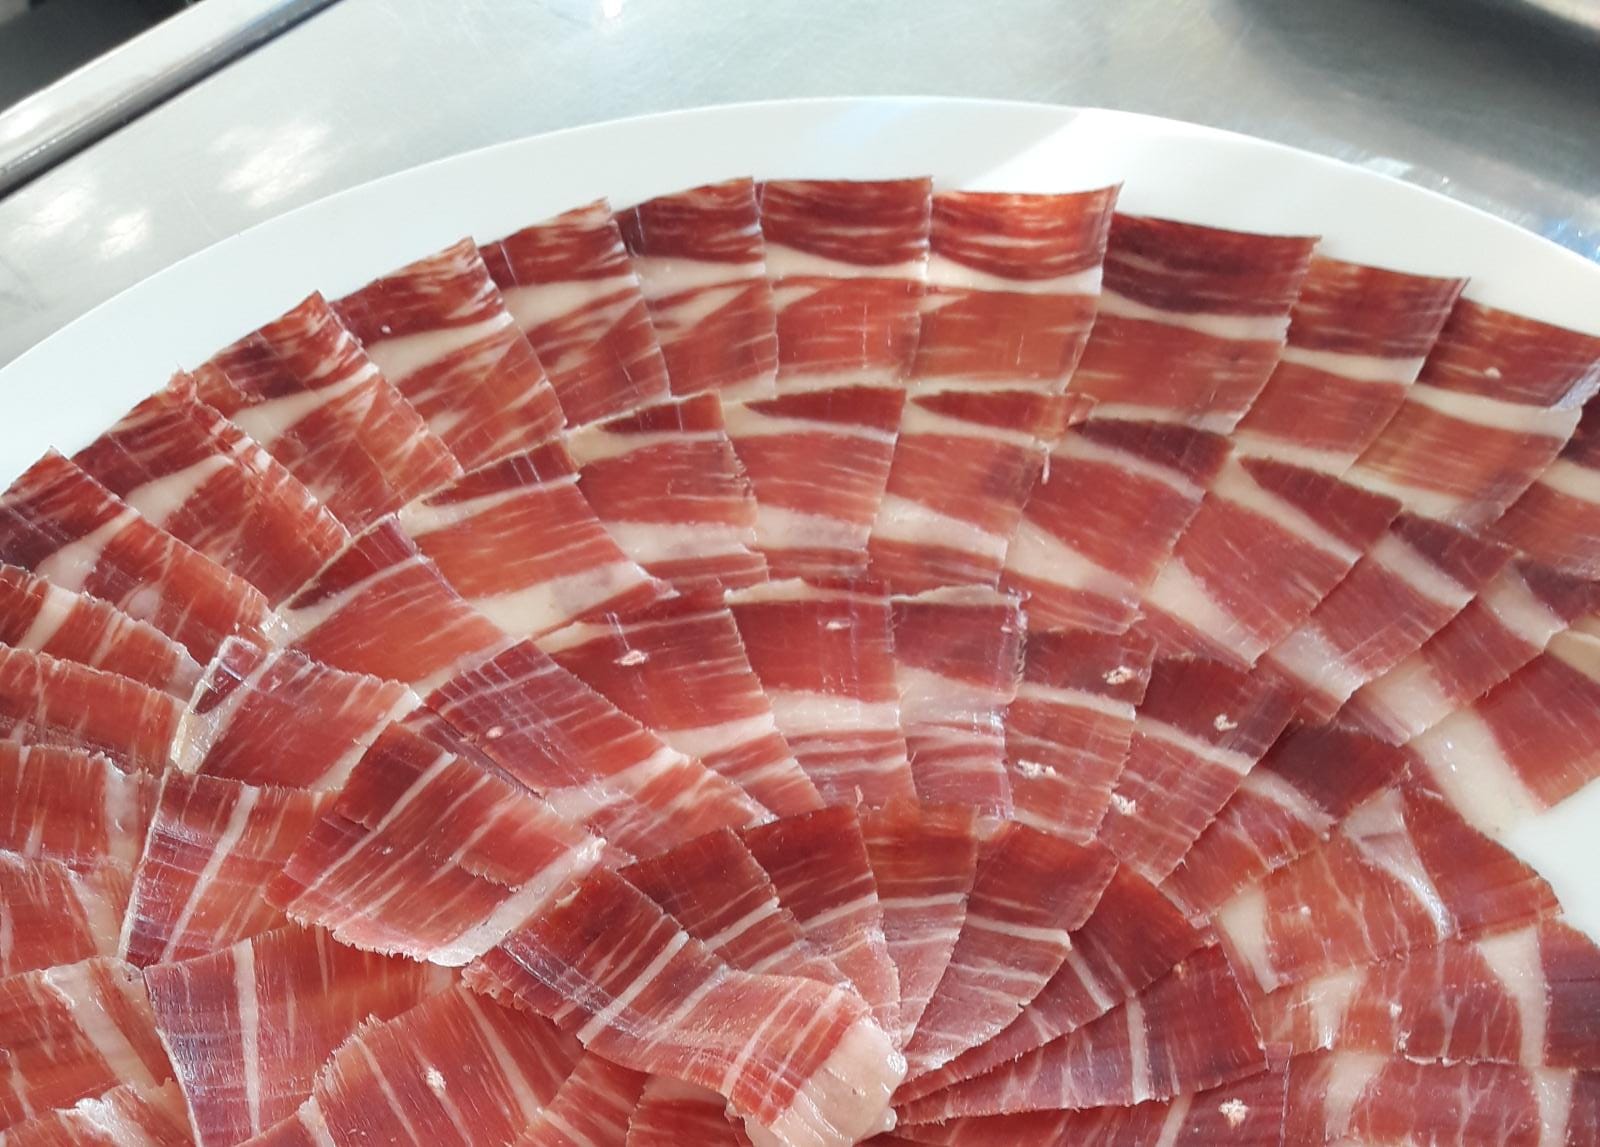
How do I plate it?
The most important thing is to “make sure to cut finely and try to make all the slices the same size.” It is advisable to use white plates to enhance the colours and place the slices harmonically without leaving any blank space. Let’s not forget that the visual aspect is very important when eating, and it’s easy to present a nice-looking plate.
In addition to all these small tips and tricks, Zulima wants to remind us of something fundamental: “For me, to cut ham perfectly, both at home and professionally, it’s essential to have the right attitude, enjoy the cutting and the company.
Cutting ham is a sacred ritual that is worthy of our best smile, inclination and cleaning, with all that and if you manage not to cut yourself, for me, it’ll be a perfect cut of ham.”
Your blog post was a compelling and insightful read. I appreciated the way you synthesized information from various sources and presented a comprehensive overview. To continue the journey, click here.